Create an event
Complete guide for creating an event, available fields, and settings
The minimum to get started
To create an event only the name is required. All other fields can be completed later by editing the event.
Tab-based creation flow
The full event configuration is organized in tabs. Not all tabs apply to every event type:
| Tab | Applies to | Description |
|---|---|---|
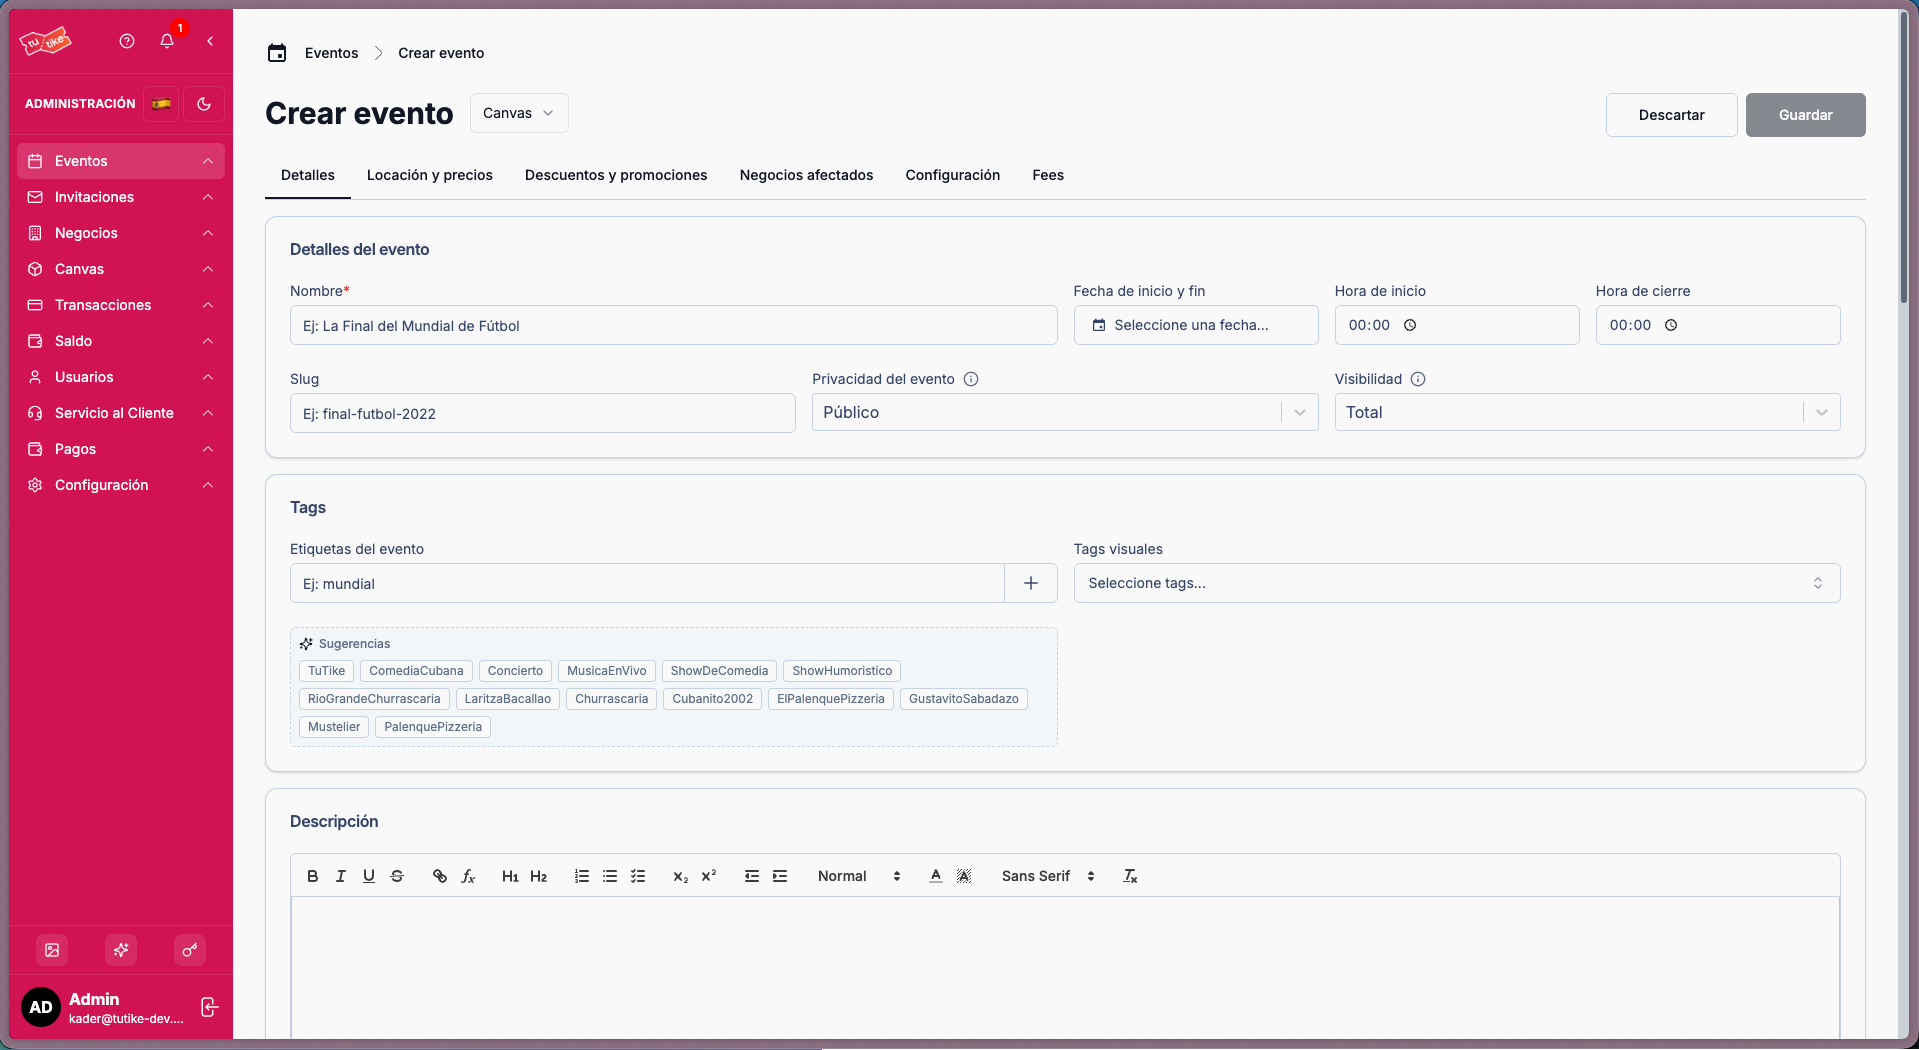
| 1. Details | All | Name, dates, slug, privacy, visibility, tags, banners, description |
| 2. Location & prices | Canvas only | Assigned canvas, price per element, free/reserved elements |
| 3. Tickets | Tickets only | Ticket types: name, price, quantity, minimum/maximum per person |
| 4. Discounts & promotions | All | Active promotion and discount coupons |
| 5. Affected businesses | All | Automatic blocking of businesses/services during the event to avoid overbooking |
| 6. Settings | All | Minimum confirmation date (blocks entry confirmation before that date), wallet, T&C, billing and re-survival, cancellation policies, payment mode |
| 7. Taxes | All | Tax name, percentage, flat fee, minimum/maximum |
| 8. Fees | All | Sale-specific fees (admin only) |
Basic information
| Field | Description |
|---|---|
| Name | Public name of the event. The only required field at creation. |
| Description | Long text with the event details. |
| Slug (friendly URL) | Identifier in the event URL (e.g. event-name). Only accepts letters, numbers, hyphens, and underscores. Auto-generated as you type the event name. |
| Event type | Defines the sales model: Canvas (interactive map for seats/tables) or Tickets by quantity (general admission). |
| Privacy | Public: anyone can view the event and reserve via the link or page. Private: only people with an invitation link generated by the manager can reserve. |
| Visibility | Full: appears on the website, carousels, and all locations. Reduced: accessible only through links. This setting is mutable and can be changed after creating the event. |
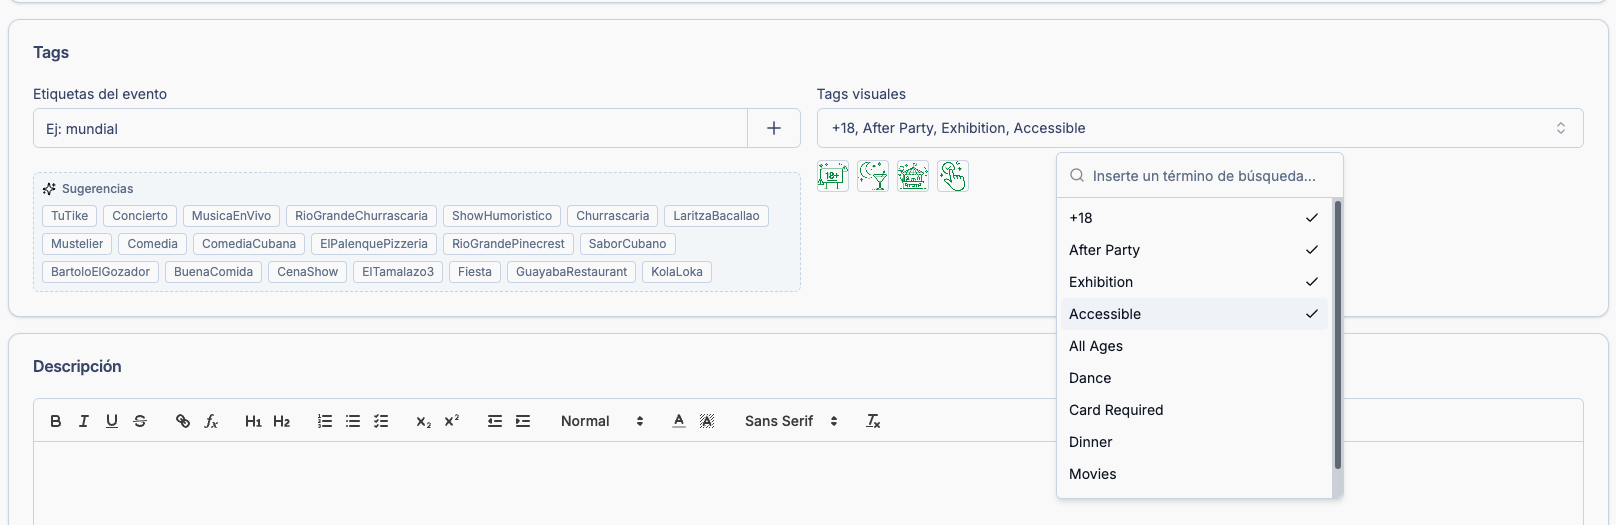
| Tags | Keywords to classify the event internally and allow event search on the website. You can also select visual tags (graphic icons) to display visual information on the event card (e.g. accessible, age 18+, children welcome, parking, etc.). |
| Digital wallet | Enables the option to add tickets to Google Wallet and Apple Wallet. |
Immutable privacy — The privacy field (public / private) cannot be
modified once the event has been created.
Locked event type — Once prices (canvas) or tickets are configured, the event type selector is disabled and can no longer be changed.
Dates
| Field | Description |
|---|---|
| Start date | When the event begins. |
| End date | When it ends (must be after the start date). |
| Minimum confirmation date | Date that blocks entry confirmation before that moment. Used to prevent a doorperson or manager from accidentally confirming an entry before the event starts. Confirming an entry means the person is already inside the venue and the entry has been used. |
| "Coming soon" mode | Publishes the event as an announcement without enabling sales yet. |
Images (banners)
To add images to the event, use the add image button which opens the gallery, then select "add", search for the image, and add it. Finally, select the image to configure it.
| Image | Description |
|---|---|
| Desktop banner | Main image for large screens (computers). |
| Mobile banner | Image optimized for mobile devices. |
| Canvas banner | Banner for the interactive map view and reservation dialogs. Should not have text as the platform adds text on top of it. |
Location & prices
In this section you select the location where the event will take place. A location is an entity that can be created on the platform (see how to create a location).
The map is the canvas you will choose, where the user can ultimately tap to select what they want to reserve. A location can have multiple maps/canvases because it may have different configurations for different events or situations (e.g. table layout for events vs. dinner reservations).
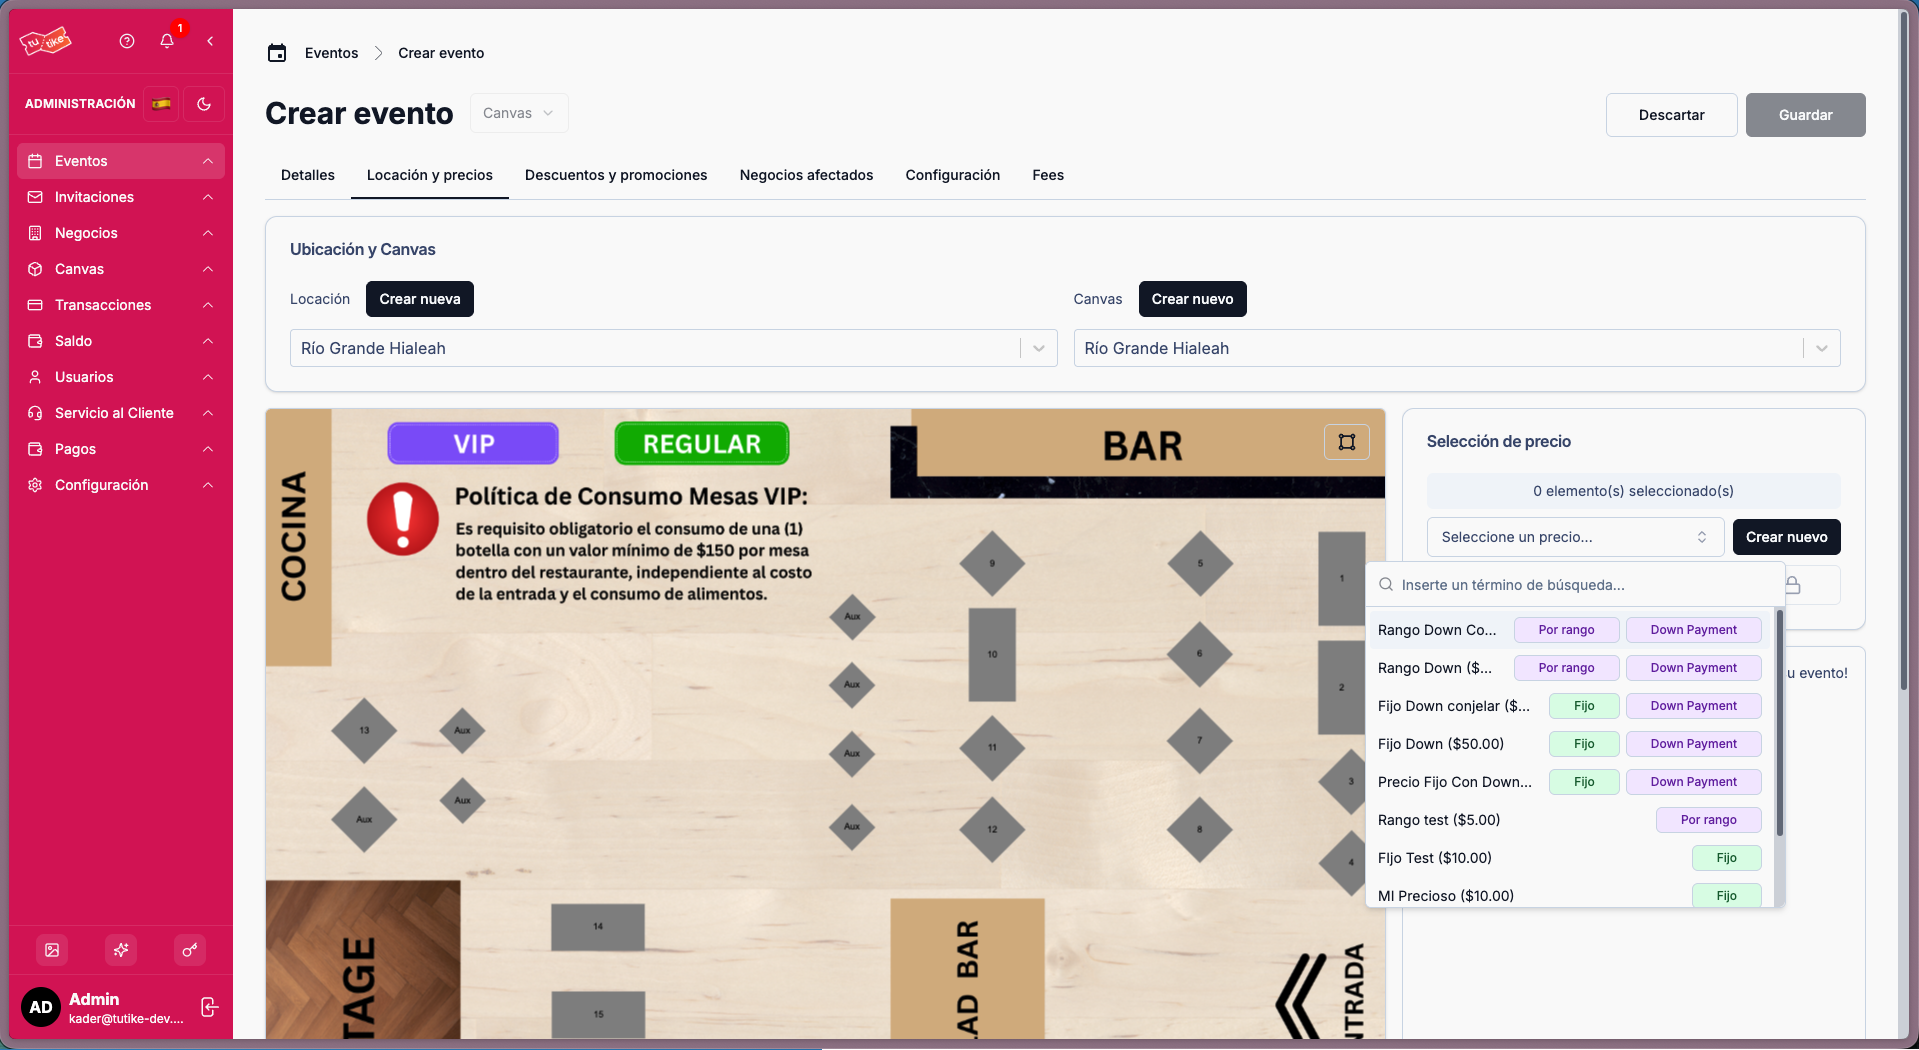
In this section you can:
- Select the event location
- Choose the map/canvas you want to configure for the event
- Configure prices for each map element
You can assign an existing price to each element or create a new price on the spot. You can also assign a free price to an element. Price colors are configured per price and are the colors users see when reserving. For more details on creating prices, see the Prices section.
Ticket types (Tickets-type events only)
If your event uses the tickets by quantity model, you define the available ticket types:
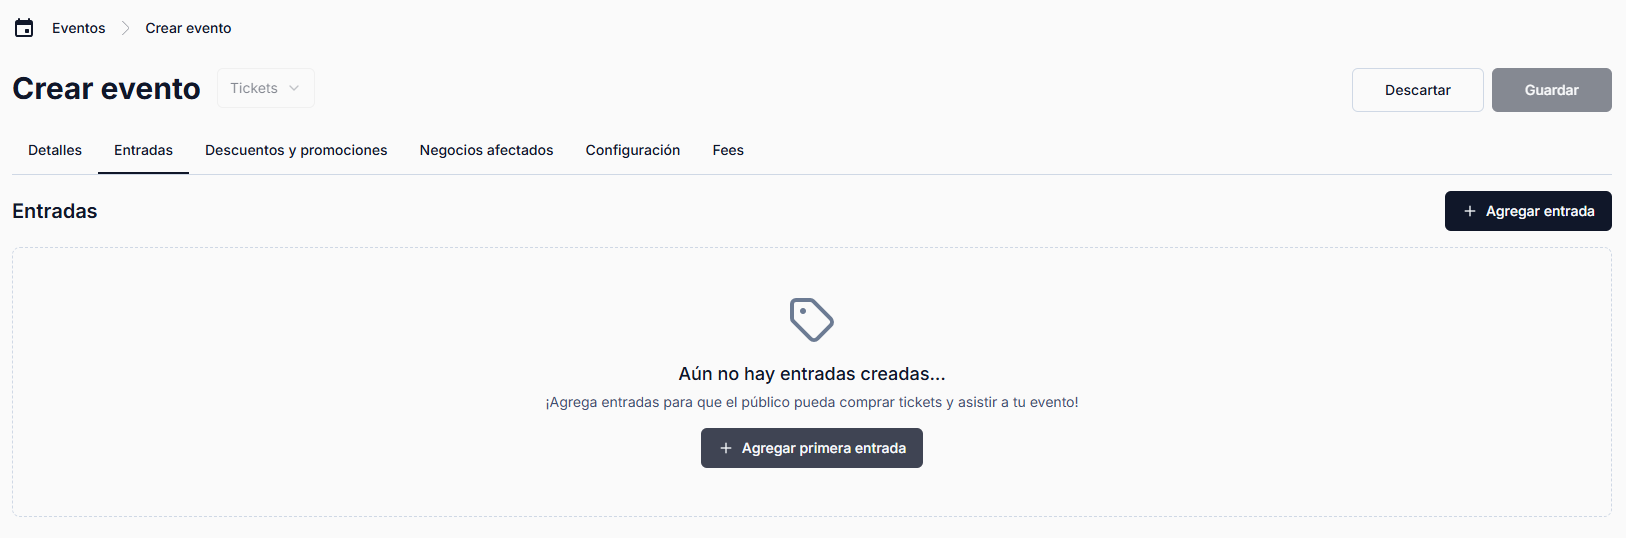
| Field | Description |
|---|---|
| Name | For example: "General", "VIP", "Student". |
| Price | Public sale price. |
| Available quantity | How many tickets exist for that type. |
| Minimum per purchase | Minimum quantity a person can buy in a single transaction. |
| Maximum per purchase | Maximum quantity a person can buy in a single transaction. |
| Description | Optional description of the ticket type (e.g. "VIP area access + drinks included"). |
Prices are entered in dollars. Check with the TuTike team if you have questions about the price unit configured for your account.
Visual tags
Visual categories for the event (e.g. festival, concert, theater). These must already exist in the system.
Settings
In this section you can configure several event categories:
Capacity register
Sets the maximum number of event attendees. This is a fallback to prevent overbooking. For example, if all tables on the map allow 2 to 8 people to make reservation easier, but not all tables can be booked for 8 due to space constraints, you can set a maximum attendee cap as a safeguard.
Mark as coming soon
Enable this option to publish the event as "coming soon" with only the name and banner, without further information. The event appears in a dedicated section for upcoming events.
Payment mode
If you have direct mode enabled in your API Access (requires payment account onboarding), you can choose how to collect payment for the event: direct mode or agent mode. If you haven't completed onboarding, you can always publish and sell events through agent mode, which is enabled by default for everyone.
Compliance & security
Minimum confirmation date
Sets the date that blocks entry confirmation before that moment. Used to prevent a doorperson or manager from accidentally confirming an entry before the event starts. Confirming an entry means the person is already inside the venue and the entry has been used.
Terms and conditions
Adds a note that the user must accept to continue and complete checkout. You can include any reservation terms and conditions you want here.
If T&C are enabled, the text is required. It cannot be empty.
Billing address
Optional but recommended field that adds security to the payment process. If enabled, the user will be required to enter their billing address at the time of payment.
Digital wallets
If you enable wallets, you can configure Google Wallet and Apple Wallet. Once the user has made a reservation, buttons to add the ticket to Google Wallet and Apple Wallet will appear on the reservation confirmation page.
Important business rules
Immutable privacy — The privacy field (public / private) cannot be
modified once the event has been created.
Locked event type — Once prices (canvas) or tickets are configured, the event type selector is disabled and can no longer be changed.
| Rule | Detail |
|---|---|
| Auto-generated slug | Automatically generated from the name + start date. Can be edited manually (3–80 characters, alphanumeric and hyphens only). |
| Required T&C note | If Terms and conditions is enabled, the text cannot be empty. |
What's next after creating?
Once the event is created, you can complete or modify its information. See the Edit an event section to learn which fields you can change and what restrictions apply based on the event status.